Here’s a step-by-step guide for you to create a new action in Sudota Actions.
If you are a new user, you can try Sudota Actions for free by signing up for an account here (no credit card required). You can then use the same account for both Sudota Actions and our add-on.
For existing users, please head to the Sudota Actions directly after signing in.
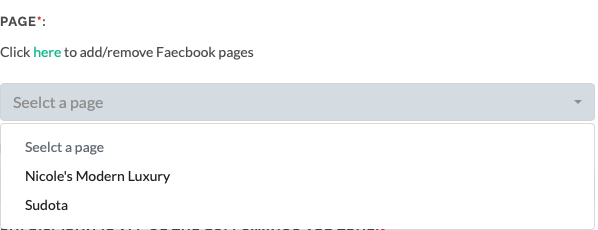
Under the “Create new actions” tab, please first connect with your Facebook account. You can either select one page or multiple pages that you want to use Sudota Actions with. (Note: Please grant all the permissions so our application can function properly.)

Next, select a page under the Page dropdown
Then after a few seconds, you should see the most recent posts under the Posts, dropdown, please select a post

Then under rules, you may add one or multiple conditions.

For Target, you may select either Comment or Username

For Conditions, you may use one of the logical operators

You may use the +/- button to add or remove conditions. If you add multiple conditions, the action will only be triggered if ALL the conditions are met

Under trigger time, you can select “All time” if you want the actions to be always on

Alternatively, if you only want to run the actions during a specific time (e.g. limited time offer), you may do so like below:
Date time:
Weekday

Hour

Finally you may define the actions you want to trigger. Again, you may use the +/- buttons to add multiple actions (e.g. reply on comment + DM user)

Once all the fields are filled in, please click SUBMIT
Then you will be redirected to the Existing actions tab. In there you should see the newly created action listed at the top.

At the top, you will find the number of active jobs, total execution count, as well as the quota allocated to your plan

In each job record, you will find:
a post link that the action is set up against

total execution count that you can click to get a full record of actions taken. Please note that the comment link is only available for comment reply

And you may resume, stop or delete actions by clicking on the buttons under Options

That’s it, you’ve now mastered the basics of Sudota Actions. Have fun automating.
If you have any feedback, please feel free to send a note to [email protected], we can’t wait to hear from you!
